
The fields allow the site visitor to enter data, and choose between options you provide.
You can also require that the site visitor complete certain fields, or the form will not submit.
Here are the fields for the form, along with their properties:
| Label | Field Type | Required |
| First Name | Single Line Text | Yes |
| Last Name | Single Line Text | No |
| Yes |
Let’s create the fields.
2.1. In the Tools area on the right in the Standard Fields box, click Single Line Text once. A text box appears in the editing area at the left:

2.2. Hover the cursor over the new field to see the control bar:

2.3. Click the Expand/Collapse triangle to expand the field.
2.4. Click in the Field Label box and enter First name.
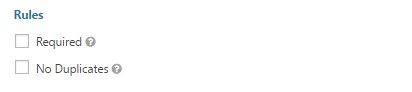
2.5. Scroll further down the box to the Rules section and click to check the Required box:
2.7. Scroll back up to see the Control bar at the top of your new First Name field box, which should still be expanded.
2.8. In the right corner of the Control bar, click the Copy icon:
![]()
A copy of the field appears below the First Name field box, and now both field boxes are collapsed.
2.9. Click the Expand/Collapse triangle of the new field box to expand it.
2.10. Select the text in the Field Label box and change it to Last Name.
Since we copied the field, the Required setting came along. We don’t want the Last Name field to be required, so let’s fix that.
2.11. Scroll down the form to the Rules section, and UNcheck the Required box.
2.12. Save your work – in the Toolbox area, click Update.
Now we’ll add an advanced field – the email field.
2.13. In the Toolbox area, click the Expand/Collapse triangle of the Advanced Fields box to expand it.
2.14. Click Email. A new email field appears in the Editing area.
We do want this field required, so let’s set that property.
2.15. Click the Expand/Collapse triangle of the Email field to open it.
2.16. Scroll further down the box to the Rules section and click to check the Required box.
2.17. Save your work – in the Toolbox area, click Update.
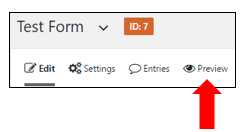
Let’s Preview our new form.
2.18. At the top of the Editing area, click the Preview icon:
A new tab opens to display the form:
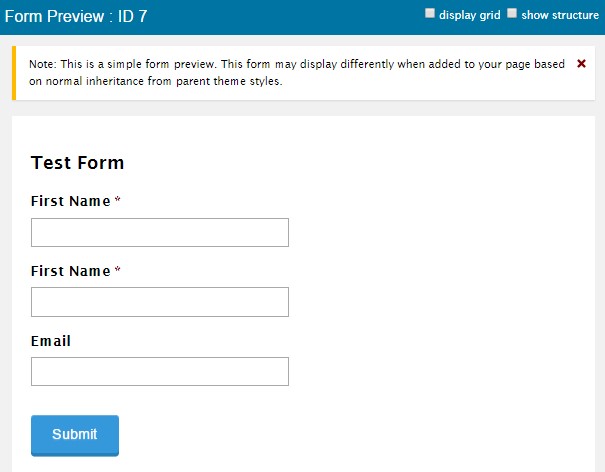
Congratulations! You’ve taken your first step in building a form.
Now we’ll move on to the form settings – editing the wording on the thank-you page.